In this guide, you will learn how to get started with the Genius Scan SDK for iOS.
The SDK for iOS is composed of multiple iOS frameworks. This modular configuration enables you to integrate just what you need.
We provide two iOS demo projects as part of the SDK:
The SDK framework files used during development may seem large, but they include slices for all device architectures (arm64, x86_64) and debug symbols. Deployed on your user’s devices, the impact is much smaller.
We provide here the approximate impact of the SDK on your app’s size. The download size is the increase in size of your app when downloaded by your users. The installed size represents the size of the SDK once installed on the user’s device.
| Core | OCR | ScanFlow | |
|---|---|---|---|
| Download size | 7 MB | 1.2 MB | < 1 MB |
| Installed size | 10 MB | 2.5 MB | < 1 MB |
Because the Genius Scan SDK is provided as dynamic frameworks placed in your app’s bundle, the App Store’s delta updates logic will skip downloading them if you update your app without updating the Genius Scan SDK.
Depending on the integration type you choose, you will need a different framework set:
| Integration type | Frameworks to include |
|---|---|
| Simple | Core, ScanFlow, OCR |
| Custom | Core |
| Custom with OCR | Core, OCR |
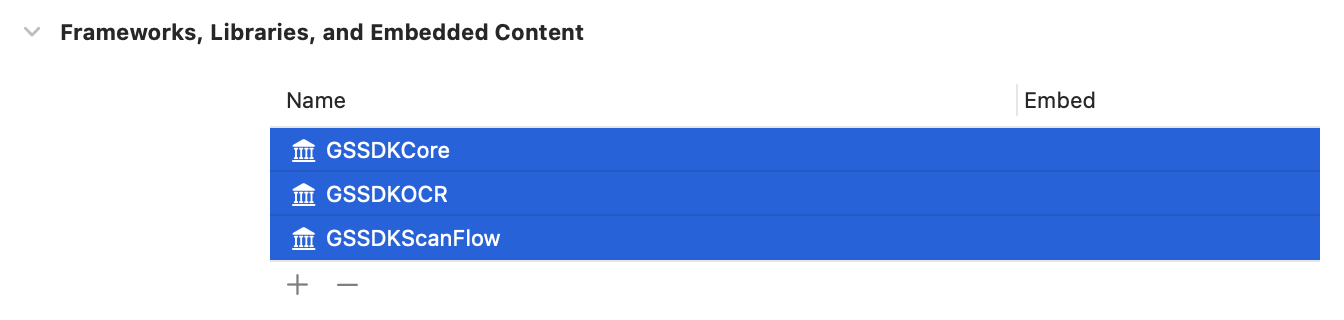
Drag and drop GSSDKCore.xcframework, and optionally GSSDKScanFlow.xcframework and GSSDKOCR.xcframework into the Frameworks, Libraries and Embedded Content of your app’s target.
Make sure that Embed & Sign is properly specified:
In your Xcode project, under Package Dependencies, add a new dependency on the Genius Scan SDK https://github.com/thegrizzlylabs/geniusscan-sdk-spm.
Then, according to the table above, select GSSDKCore and optionally GSSDKScanFlow and GSSDKOCR depending on your desired integration.
If you already use CocoaPods, you can use the Genius Scan SDK as a Pod. Just add the following line to your existing Podfile.
pod 'GSSDK', :podspec => 'https://s3.amazonaws.com/tgl.geniusscan.sdk/GSSDK-4.14.0.podspec'
The SDK is modular, so you can also include only the desired subspec: Core, OCR or ScanFlow:
pod 'GSSDK/Core', :podspec => 'https://s3.amazonaws.com/tgl.geniusscan.sdk/GSSDK-4.14.0.podspec'
pod 'GSSDK/OCR', :podspec => 'https://s3.amazonaws.com/tgl.geniusscan.sdk/GSSDK-4.14.0.podspec'
pod 'GSSDK/ScanFlow', :podspec => 'https://s3.amazonaws.com/tgl.geniusscan.sdk/GSSDK-4.14.0.podspec'
The Genius Scan SDK is subject to a commercial license: a license key is needed to initialize the SDK. The key must match your application identifier (aka. bundle ID) and the license’s expiration date. Please contact us if you don’t have a license key yet.
The SDK can run without a license key but will stop working after 60 seconds.
You initialize the SDK with your license key as follow:
GSK.setLicenseKey("<YOUR LICENSE KEY>")
By default, the SDK will use the license key set in code to refresh your license, ensuring your users always benefit from the SDK features. For additional reliability, we still recommend to update the license key in the code when your license is renewed.
You can turn off auto-refreshing by using the autoRefresh parameter.
GSK.setLicenseKey("<YOUR LICENSE KEY>", autoRefresh: false)
When your license key renews, you will take care of updating it in the app, either by releasing an update with the new license key, or building your own remote refresh logic.
Your app is going to need the user’s permission to access the camera. You need to specify the reason for requesting this permission as part of the NSCameraUsageDescription in the Info.plist.
Once you have done this, you’re ready to start your actual implementation. The next steps will depend whether you chose the simple integration, using the ScanFlow module, or if you are going for a custom integration.
© 2024 The Grizzly Labs. All rights reserved.